Paper Folding Conics:

The farthest left conic is by folding a dot off a line onto a line multiple times and its result was a parabola if we were to be done an infinite amount of times. The middle figure is a dot inside of a circle and the folding the dot onto the circle. The resulting figure when done it an infinite amount of times an ellipse. The third image is a dot outside of the circle folded onto the circle and its resulting image is a hyperbola.
As I was working on these folding sections I was thinking about what would happen if I moved the points around the circle or farther/closer to the line. I did cheat a little bit and some students after school saw me folding the paper and wanted to join, but this still only gave me a limited number of results.My next option was to work with Geogebra and see what happens.
Conics with Geogebra:
In comparison to the Patti Paper the final image is the same. The parabola, is still created when we use the graphing software program. To create this parabola, I placed a number of points on the vertical line. Next I created bisecting lines from each point to the point off the line. I repeated the process through all the points on the vertical line. Once all the bisecting lines are gathered together you can see the shape of the parabola starting to come together.
Because I was using the Geogebra program I was able to answer some of the questions I couldn't with Patti paper. Like how the closer you get to the line the sharper the curve is of the parabola and the farther you get away the wider the parabola becomes.
 To create the ellipse I did a similar process to the parabola above. I created a circle and a point within the circle. Next I placed a number of point on the circle. Just like the project above I found the bisecting line between each point and the point outside the circle.
I was able to move the point inside the circle around and observe the different shapes the bisecting lines created. The closer you get to the center the closer the shape of the lines get to becoming a circle, only when the point we are moving around is the center do we get the perfect circle.

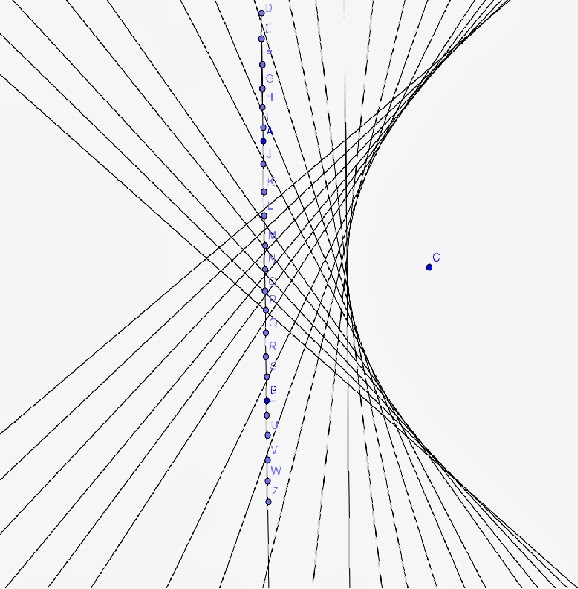
The hyperbola was created using the same program as the ellipse. The only difference is when the point is outside the circle does it turn into a hyperbola.
Using Geogebra allowed me to observe what happens when when we change the circumstances of the problem. It was very quick for me to see what happens when I place the dot I'm moving around on the line. I noticed all the lines crossed in the center of the circle. There was no true shape created by all the trend of the lines. It was one of the benefits of Geogebra. The ability to instantly move items around allow for quick feedback.
Conics with String Art:

The last work with conics came to mind after a conversation at the lunch table with the art teacher. I came up with the idea after coming across the a Geoebra program were the student can design their own string project before they begin. Working with the string art was good may have been the most time consuming but it was definitely the most rewarding.
When comparing the three versions of I worked through this week, all have their highlights. If I were to judge them against another, the Geogerba program would take the cake. It is works best when it comes to manipulating the figure and seeing overall concepts. Although all would be great to work in class. I can see a future cross curricular project with the art teacher to incorporate all learners.
No comments:
Post a Comment