The topic to begin every staff meeting is how are we preparing the students for the Smart Balance Assessment that correlates to the Common Core State Standards. Even to day in the department meeting our department chair was talking with us about the use of Depth of Knowledge (DoK) questions so students are accustomed to high level level questions. This evening I spent a good majority of time dissecting the practice test found at the Smarter Balance website.. This is was a good experience for me in preparation for my project in m641. In order for me to create a outstanding lesson plan I need to create an outstanding summative assessment. My goal to create a similar assessment to the one provided by the smarter balance assessment for the students at the end of their Geometry Unit that will have the Common Core State Standards as their foundation.
As I continued to take the assessment at Smarter Balance I was amazed by the number of different learning targets I was using to solve a particular problem. I was often thinking the question was written to trick the students. After continued reflection I came to the realization the assessment wanted to assess the students on a wide variety of learning objects for a single question. This is going to be a major hurtle for the way I have been teaching and for the way I was taught. So often growing up for me and seeing the released items from older MEAP assessment the questions where basic problems (i.e. add these fractions). Now they ask the students to perform a number of operations with fractions then identify if it is larger or smaller than a given value or it doesn't' ask the student to find the mean from a set of values it asks the students, "how much did the mean number of push ups increase in these two line plots from gym class."
Creating questions of this nature are going to take some time, I believe creating one unit a year would be a good goal. For this year and this class, I am going to use a majority of my last few weeks of m641 to prepare a summative assessment based on the smarter balance questions.
Monday, November 18, 2013
Tuesday, November 12, 2013
3 Different Methods to Conic Sections
As the article "Paper Folding and Conic Sections" by Scott G. Smith starts out, "One sign of a good problem can be approached in more than one way." I spent my time this week trying to achieve this goal. The first way was provided by the article by using Patti Paper, the second is hinted at by Smith but doesn't go into detail and that's by using a sketchpad, and lastly I discover on my own by having a conversation with our art teacher by creating String Art.
Paper Folding Conics:

The farthest left conic is by folding a dot off a line onto a line multiple times and its result was a parabola if we were to be done an infinite amount of times. The middle figure is a dot inside of a circle and the folding the dot onto the circle. The resulting figure when done it an infinite amount of times an ellipse. The third image is a dot outside of the circle folded onto the circle and its resulting image is a hyperbola.
As I was working on these folding sections I was thinking about what would happen if I moved the points around the circle or farther/closer to the line. I did cheat a little bit and some students after school saw me folding the paper and wanted to join, but this still only gave me a limited number of results.My next option was to work with Geogebra and see what happens.
In comparison to the Patti Paper the final image is the same. The parabola, is still created when we use the graphing software program. To create this parabola, I placed a number of points on the vertical line. Next I created bisecting lines from each point to the point off the line. I repeated the process through all the points on the vertical line. Once all the bisecting lines are gathered together you can see the shape of the parabola starting to come together.
Because I was using the Geogebra program I was able to answer some of the questions I couldn't with Patti paper. Like how the closer you get to the line the sharper the curve is of the parabola and the farther you get away the wider the parabola becomes.
 To create the ellipse I did a similar process to the parabola above. I created a circle and a point within the circle. Next I placed a number of point on the circle. Just like the project above I found the bisecting line between each point and the point outside the circle.
I was able to move the point inside the circle around and observe the different shapes the bisecting lines created. The closer you get to the center the closer the shape of the lines get to becoming a circle, only when the point we are moving around is the center do we get the perfect circle.

The hyperbola was created using the same program as the ellipse. The only difference is when the point is outside the circle does it turn into a hyperbola.
Using Geogebra allowed me to observe what happens when when we change the circumstances of the problem. It was very quick for me to see what happens when I place the dot I'm moving around on the line. I noticed all the lines crossed in the center of the circle. There was no true shape created by all the trend of the lines. It was one of the benefits of Geogebra. The ability to instantly move items around allow for quick feedback.

The last work with conics came to mind after a conversation at the lunch table with the art teacher. I came up with the idea after coming across the a Geoebra program were the student can design their own string project before they begin. Working with the string art was good may have been the most time consuming but it was definitely the most rewarding.
When comparing the three versions of I worked through this week, all have their highlights. If I were to judge them against another, the Geogerba program would take the cake. It is works best when it comes to manipulating the figure and seeing overall concepts. Although all would be great to work in class. I can see a future cross curricular project with the art teacher to incorporate all learners.
Paper Folding Conics:
The farthest left conic is by folding a dot off a line onto a line multiple times and its result was a parabola if we were to be done an infinite amount of times. The middle figure is a dot inside of a circle and the folding the dot onto the circle. The resulting figure when done it an infinite amount of times an ellipse. The third image is a dot outside of the circle folded onto the circle and its resulting image is a hyperbola.
As I was working on these folding sections I was thinking about what would happen if I moved the points around the circle or farther/closer to the line. I did cheat a little bit and some students after school saw me folding the paper and wanted to join, but this still only gave me a limited number of results.My next option was to work with Geogebra and see what happens.
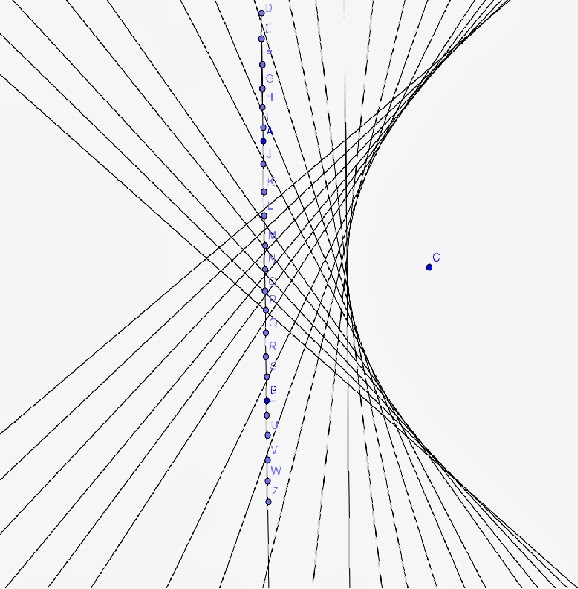
Conics with Geogebra:
In comparison to the Patti Paper the final image is the same. The parabola, is still created when we use the graphing software program. To create this parabola, I placed a number of points on the vertical line. Next I created bisecting lines from each point to the point off the line. I repeated the process through all the points on the vertical line. Once all the bisecting lines are gathered together you can see the shape of the parabola starting to come together.
Because I was using the Geogebra program I was able to answer some of the questions I couldn't with Patti paper. Like how the closer you get to the line the sharper the curve is of the parabola and the farther you get away the wider the parabola becomes.
To create the ellipse I did a similar process to the parabola above. I created a circle and a point within the circle. Next I placed a number of point on the circle. Just like the project above I found the bisecting line between each point and the point outside the circle.I was able to move the point inside the circle around and observe the different shapes the bisecting lines created. The closer you get to the center the closer the shape of the lines get to becoming a circle, only when the point we are moving around is the center do we get the perfect circle.
The hyperbola was created using the same program as the ellipse. The only difference is when the point is outside the circle does it turn into a hyperbola.
Using Geogebra allowed me to observe what happens when when we change the circumstances of the problem. It was very quick for me to see what happens when I place the dot I'm moving around on the line. I noticed all the lines crossed in the center of the circle. There was no true shape created by all the trend of the lines. It was one of the benefits of Geogebra. The ability to instantly move items around allow for quick feedback.
Conics with String Art:
The last work with conics came to mind after a conversation at the lunch table with the art teacher. I came up with the idea after coming across the a Geoebra program were the student can design their own string project before they begin. Working with the string art was good may have been the most time consuming but it was definitely the most rewarding.
When comparing the three versions of I worked through this week, all have their highlights. If I were to judge them against another, the Geogerba program would take the cake. It is works best when it comes to manipulating the figure and seeing overall concepts. Although all would be great to work in class. I can see a future cross curricular project with the art teacher to incorporate all learners.
Tuesday, November 5, 2013
Exploring Escher
I have been very fascinated with the art of M.C. Escher the last few years. His designs will captivate your mind. In our October 29th meeting of class, the professor gave us some background on the geometry behind his work. For my outside of class this week, I would do some exploration on my own. The following is my "Metacognative Memoir" or thought process, on a few of Escher's pieces of art..
My First Piece.

I started by using a "duel" technique.
Steps:
If you find the center of each of the small lizards and place a dot in the same location on each of them. For me I used the top of the back right before the the neck started to turn to the head. Once you have all the locations found, I connected each dot to its neighbor. This formed a series of triangles over the whole paper. I could tell there was a pattern starting.
For it to be "duel" you repeat the process only using the shapes your found from the first step. I took the center of each of the triangles and connected those dots to one another. When I did this last step, I used patty paper over top or the original pictire. Below is my result.

The new insight gained from these pictures gave me an appreciation for his work. I will continue to explore some additional art of M.C. Escher.
My First Piece.

I started by using a "duel" technique.
Steps:
If you find the center of each of the small lizards and place a dot in the same location on each of them. For me I used the top of the back right before the the neck started to turn to the head. Once you have all the locations found, I connected each dot to its neighbor. This formed a series of triangles over the whole paper. I could tell there was a pattern starting.
For it to be "duel" you repeat the process only using the shapes your found from the first step. I took the center of each of the triangles and connected those dots to one another. When I did this last step, I used patty paper over top or the original pictire. Below is my result.

It turns out the figure behind the lizards is an octagon and a rhombus. He used this general out line for the design of his picture.
I was very excited to see this work. With my excitement I decided to show my advanced class to students the Escher piece. There enthusiasm was greater than the experience with the Euler Line (see blog post "The Great Result"). When I showed the student the work I showed them another piece I was working on with Geogebra the same way. Geogebra of Echer's Work
This piece took me quite some time to look over. I had about three of four different trials. I don't know if this is even the right path, but it seems to work well.
Analyzing the Angels and Demons picture on Geogebra. It woks perfectly until you get to the rhombus' and then there are more dots on the paper than are used to make the figures. Also the figures are not as regular polygon as I would think they should be.
The new insight gained from these pictures gave me an appreciation for his work. I will continue to explore some additional art of M.C. Escher.
Tuesday, October 29, 2013
My Project Fall 2013
After reviewing Jen's aMAZing Geogebra program and reviewing her Unit Plan. I am going to write my own unit plan or at least get a good start on one. I am going to incorporate the many different topics taught in the MAT 641 class.
The link that follows are the CCSS I am going to achieve for this unit. 7th Grade Geometry Standards
I am starting to piece together topics that can be used.
The link that follows are the CCSS I am going to achieve for this unit. 7th Grade Geometry Standards
I am starting to piece together topics that can be used.
- Vocabulary - Turning Origami into the Language of Mathematics
- Euclid - Book I
- Patty Paper - http://www.michaelserra.net/weblog/patty-paper-geometry-1.html
- Geogebra - Compass - straight edge
- Incorporate Euclid into unit plans.
Some items I still need assistance with are 3 - dimensional drawings (quadrilaterals, polygons, cubes, and prisms) - I am thinking this would be a good place to incorporate Geogebra tube.
I have started a Unit Plan on Google Drive - Geometry Unit
Tuesday, October 22, 2013
Patty Paper vs. Compass/Straight Edge
Last weeks class my eyes were wowed to the idea of creating figures using patty patter. You know, the paper between your frozen hamburgers. For 2 hours my classmates and I constructed basic quadrilaterals squares, rectangles, trapezoids, rhombus, parallelograms, and also basic bisecting properties. I have had zero past experience with patty paper and was very impressed with the ease of transformations.
My thoughts are with the patty paper, the students understand the ideas behind the constructions a lot better. For example. When creating an angle bisector, you take an angle and you fold the two sides of the angle on top of one another. When you create the crease were the fold line happens you then get the bisecting line of the angle. Or take for example the perpendicular bisector of a line. Fold the patty paper on itself so the line on the paper is exactly on top of itself including the two end point on one another. From here you really understand the idea that a perpendicular bisector is a perpendicular line in the middle of an original line. The thought of the topic becomes so clear on what this vocabulary is and the student is not lost in the process. Which happens when we construct objects with compass and straight edge.
Why would we use a compass and a straight edge then. One of my philosophies as a teacher is, "I teach students with math, I don't teach math" Compass and straight edge are a great tool for teaching fine motor skills. Using these items takes practice and more practice. Students can fine tune these skills and become very good at creating simple constructions. My fear is students become lost in the idea of creating the figure and don't focus on what they are trying to achieve. For example a simple reflection of a figure over a line with a compass and straight edge takes 4 or 5 different actions for each vertices of the figure. If you are reflecting any quadrilateral the student is constructing 20 different movements. They loose sight of the idea that the image is "flipped" over a line. With patty paper it is simple and obvious. The figure is drawn and you make a fold over the line and copy the figure to the other side of the figure.
What is the conclusion then? I believe there can be a balance of the two. The skills compass and straight edge provide working side by side with patty paper can be the best for student's learning. This way we are getting the best of both worlds. We can even can throw in technology constructions for a well for a rounded learning experience that differentiates to all students.
Tuesday, October 15, 2013
Jen’s aMAZEing GGB
While looking through through the weeks activities on what is required. I was able to tap into my inner child. Any time you get to play with a maze, it is hard to pass up the opportunity. I spent the first five minutes with the maze just trying to find my way through the difficult sequences to be successful. It was a mighty challenge turning left and right especially when the car got faced the up-side-down (opposite way of start). I often found myself hitting the wrong direction and crossing over the walls and having to restart.
After continued failures I started to become more reactionary. The left and right movements no longer became left and right. I was getting the sensations I as in the car and moving forward with the vehicle itself. My errant turns became less problematic and I was successful more often, completing the maze quickly and flawlessly.
After mastering the craft of rotational translations, I decided to give a few 7th graders a crack at it. Much like my experience they continued to turn the wrong direction and cross the walls. I was interviewing them about their experience and asked them what was making it so hard? The response was almost always carelessness. The students did not pay any attention to the writing on the buttons signifying turn left or turn right.
I pondered why they would not pay attention to the scrip on the buttons. My conclusion is, video games. Especially the older the video game the more alike to the aMAZeing program, games like Pack-man come to mind. Many of the original NES games where you control a character on a 2-dimensional map moving up, down, left, or right are also similar to the maze. Maybe there are some benefits to videos games, I'm going to look into more ways to incorporate them into math class.
At the end of my reflection with Jen's aMAZeing GGB I looked at her Unit Plan which included the maze program. I was shocked and taken back with her lessons. Her incorporation with history is "amazeing." Being certified to teach history as well as math, I have always wanted to incorporate the great mathematicians of the past into lessons. I need to start doing this more. I am assuming she is not using a textbook for this lesson. Seeing this amazing unit plan has motivated me into looking at dropping our new textbooks for a self created unit. I'm going to use my time in MAT641 to do this, more to come....
Jen's aMAZEing GBB: http://www.geogebratube.org/material/show/id/48117
Tuesday, October 8, 2013
The Great Result:
The great result in education is passed by for so many students. How can I compete with Hollywood when everyone is trying to be out "shock" the general public, how can a math lesson complete with a Meat Suit or an interesting Mickey Mouse outfit at an awards show.
After leaving my MAT 641 class at Grand Valley, I was in awe with the Euler line (see http://www.geogebratube.org/material/show/id/52099 ). How can the line found by finding the curcumcirlce, orthocenter, and incircle of a triangle form a straight line. It was amazing these three different points found inside and around a circle where so closely intertwine. It was almost beautiful how they worked.
I was so moved by the Euler Line, I showed my advanced class this amazing piece of math when they finished their quiz. I created the work using geogrebra in front of them so they could see the complexity of each of the points. Once I completed the work, I was glowing with anticipation to show them the true meaning of Math. When I hit the climax, ready to move the vertices around showing the Euler's Line always holds true. The response I got in return was, crickets, nothing, not even a, wow that's kind of cool.
Was I over hyping an idea only Math Geeks would enjoy or was my delivery wrong. I pondered my conundrum over the weekend. My conclusion is that if you don't see the beauty in math when it hits you right in front of your face your not going to get it. Similarly if you pass a 1971 GT 500 Mustang and you don't turn and watch it drive away. I blame you and not the car. But how can we fix it so all students can have a love for a subject in which they seem is dislike.
My mission this year is to have students see the beauty in math. It is so much more than adding fraction and converting between different units and finding roots. Math is an art that should seen as breath taking ideas ideas and thoughts. I want them to enjoy the great result that is mathematics.
Subscribe to:
Posts (Atom)